Our house is a constant organizational challenge - organization is not my strong suit. I'm one of those people with piles of stuff everywhere. I know where things are in the piles (as long as no one else moves them), but I just can't seem to get rid of them. I keep trying though! Add 2 kids, a husband, and a mother-in-law to the mix and we have stuff EVERYWHERE.
Lately I've been trying to tackle the toys. They're all over the place! I tried getting rid of a few... but I barely made a dent. I've tried rearranging to see if they take up less usable space if I put this giant thing over there and this pile here... but it hasn't helped much. One of the biggest obsticles is a giant cardboard box that has been one of my little girls favorite toys for over a year now. When I saw this idea for a collapsible cardboard playhouse on Pinterest, I had to try it! My triceps are a little sore from pulling and ripping off all that duct tape, but success! I made a few alterations since my box was bigger than the one in the tutorial, and our playhouse has front doors :)
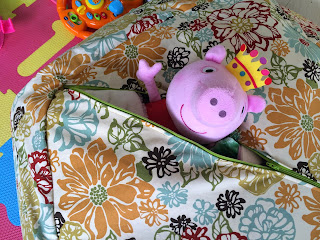
I also managed to make serious headway on this clever idea for making a bean bag type chair stuffed with stuffed animals, and was able to finish it up during naptime yesterday. There is a detailed tutorial by GoogieMomma for the S.A.C. (Stuffed Animal Chair), and Sherri at Little Thread Riding Hood made up some printable patterns and added some extra tips. I made the larger size from the printable pattern, though I didn't use batting so I made the lining a little shorter and added some stuffing like GoogieMomma had recommended. I think it turned out pretty well, but when my mother-in-law saw it she laughed and said (in Spanish), "It looks like a giant pumpkin!" Little girl liked it though, and a serious jumping/play session took place on it yesterday evening.
 |
| Here it is - the giant pumpkin |
 |
| Ignore the disaster that is our playroom |
 |
| My first semi-applique! |
 |
| Surprise! A zipper in the bottom lets you add or remove stuffed toys, as demonstrated by Peppa Pig. |
I was very proud of myself for completing this project for several reasons:
- I finished!
- I found a mistake in the instructions BEFORE I did it, so no mistake for me ☺ (when sewing on the inner lining shell, both the outer and inner shells should be inside out, so that when you turn it all right-side-out the wrong sides touch - the diagram shows the outer-shell-right side out but the inner shell in-side-out)
- I figured out how to finish it with NO HAND SEWING, HOORAY!
- I learned a few things, like an easier way to do a zipper than I'd been doing.
- I did my first (sort of) applique (a little pentagon on top to make it look nicer).
- I only jammed my machine once.
- I used up a whole bunch of fabric that I'd bought for curtains but the husband didn't like. Waste not!
- I finally sewed in my new crafting space in the back entry foyer - which means I cleaned off enough of the random clutter we accumulate to actually use the table!
Up next: open shelves in the mudroom/craft room/entry way, and possibly a new bench?


No comments:
Post a Comment